- Joined
- Nov 12, 2014
- Messages
- 190
- Likes
- 294
- Degree
- 1

What is Google Tag Manager?
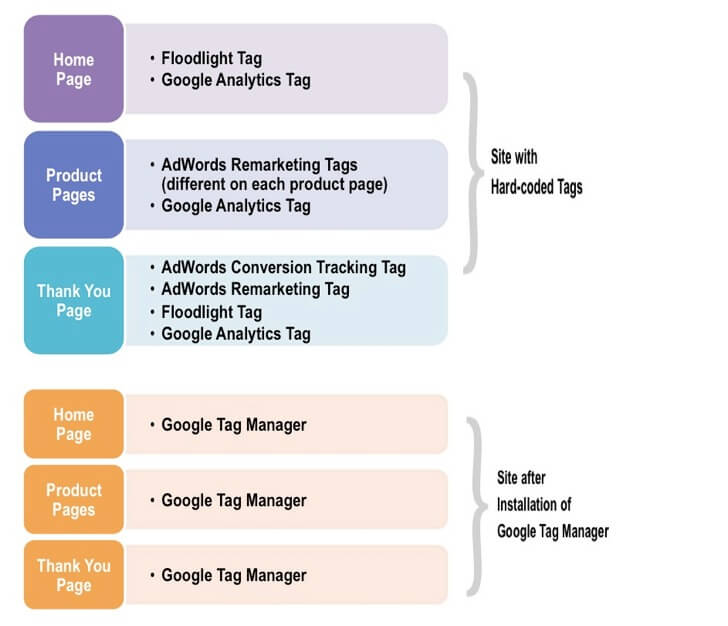
Google Tag Manager is a free tag management system offered by Google. If you have multiple tracking scripts and tags (Analytics, re-marketing, E-comm, Custom HTML, etc) on your website, GTM allows you to store them in a container and fire them as needed.
When this system is used correctly, deploying new marketing tags and code is easy and will not break code in your source. This allows marketers to focus on ROI and marketing, rather than debugging code and scripts. If GTM is new to you, I strongly suggest taking the GTM fundamentals course offered by Google to get an idea of how this platform works!
Getting Started With GTM
Starting out with Google Tag Manager is fairly straightforward—With the updated visual UI, making your first tag is simple. In this primer series we will be walking through the process of setting up an account and a few basic tags. This GTM guide will follow these steps
- Creating A GTM Account
- Creating A Website Container
- Installing GTM Container
- Create Google Analytics Tracking Tag
Creating A Google Tag Manager Account
Creating a GTM account is free and pretty painless. If you already understand how to create an account/container and installing it, you can move down to the tag creation section. But we will be walking through the process from start to finish.
If you do not have a Google account, I suggest creating a gmail account that will be used for all your accounts. (GTM, Analytics, AdWords, etc) and are connected. This will help you down the road with account organization as well as being able to see all the data Google offers from one login. After you have created a Google account it is time to create your GTM account.
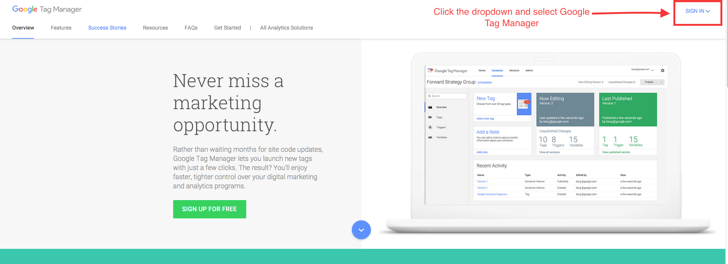
Navigate To https://www.google.com/analytics/tag-manager/ And Sign In
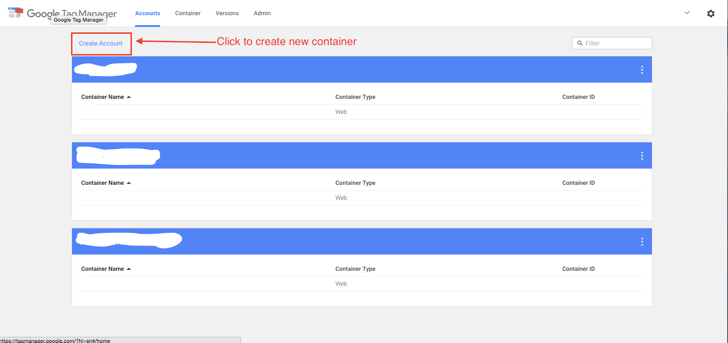
After creating an account you should be brought to your GTM account home page. If you have nothing set up there should not be much there, if you do have accounts already in GTM, this is where you will see them all. After you have created your account the next step is creating the container that will be placed on your site
Creating A Google Tag Manager Website Container
First of all, what the hell is a GTM container?
The simplest way to understand how containers work in GTM is to associate the concept with a real life example.
"In your home you may have a storage box that contains different seasonal decorations. Items such as Thanksgiving dishes, Christmas lights, and Easter decorations are all in this same box. When the time comes to use each one of them, you can use them for the corresponding holiday, but you do not have to use the other items in the box as they are not needed. Rather than having a box for each season or holiday, you keep all of the items in one central “storage box” and only use the ones needed."
This is the same concept of Google Tag Manager. The GTM container holds all of your scripts/tags that need to run on your website (Analytics, Adwords, Distilled, HTML Tags, etc.). Essentially it is one piece of code that resides on your site that can store your scripts and fire them based on rules set in GTM.
Take a look at the description from Google at https://support.google.com/tagmanager/answer/6103697?hl=en
Now that we have an idea of how this tool works, it is time to create the container that will hold our tags and scripts for our website.
From your GTM account homepage, navigate to the “Create Account” link and click.
The Google Tag Manager container is the backbone of the GTM platform. This container holds all of your tags and scripts and fires them on the pages you specify. Creating your GTM container is easy, so lets setup a container for our website. I will be using my personal blog as an example. See images below.
Setup Account and Give It A Descriptive Name
When I create my accounts, I typically name the account whatever the company name is. e.g. “Builder Society” as the account name. Whatever you name this will be shown as the account from your GTM homepage, in my case I have 30 clients with GTM, so I try to name them something I can easily distinguish from other accounts.

After you have chose a name click the continue button below the “Account Name” field. There is a checkbox to share data with Google and other, this option is entirely up to you, I typically choose not to share data, but if you would like, you can check that box and it will not have any effect on how GTM works.
Naming Our GTM Container and choosing container type
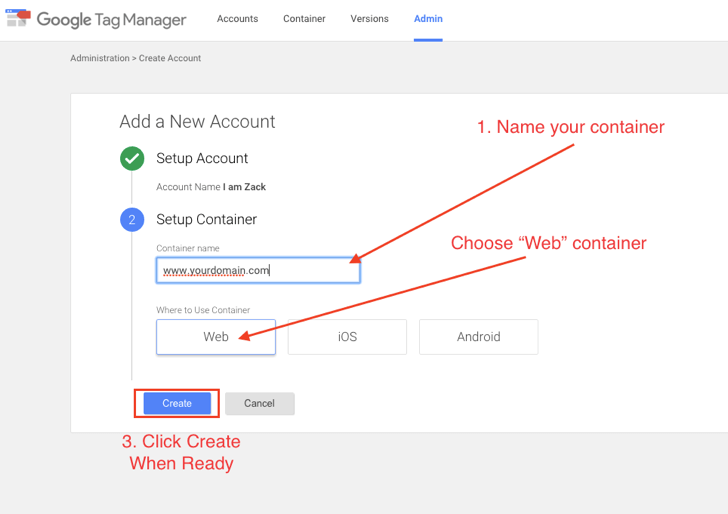
After you have named the account the next step is to setup the container. I typically name my containers whatever domain/subdomain you will be putting it on. This just helps with accounts with multiple containers.
After choosing a container name, you are asked where you will be using the container. As you can see GTM can be used on a website, iOS application as well as android applications. So from an organization standpoint you can create an account, and then multiple containers for each of your properties. For this example I will be putting a container on a wordpress website, so choose the “Web” option like pictured below. When you are done you can click “create” and we are ready to go!
You will be prompted to accept the ToS agreement, click yes. You will be then taken to the account screen and presented with the container code. Don’t worry about this right now, we will be installing that code snippet shortly.
Installing Your GTM Container On Your Website
Now that we have created the account and the website container, it is time to take the container code and put it on our website. Now there are many different ways to get this code added, and depending on your knowledge, you may need a developers help.
There is a wordpress plugin also that we will cover if you are not comfortable adding the code manually to your website. Also be sure to use https://developers.google.com/tag-manager/quickstart if you run into any issues.
Navigate to your account and find your code snippet.
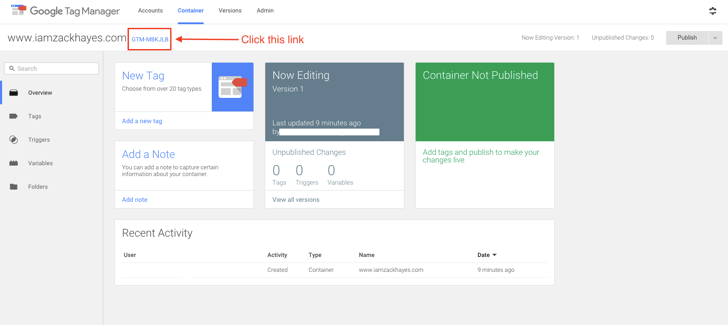
This screen is the container home page, from here you can do many different things such as seeing the tags you have created as well as recent activity. Make yourself familiar with the user interface as this is where you will be spending most of your time. When you are ready, navigate to the container number “GTM-XXXXXX” in the top left corner. Click this link.
After clicking this screen, you will get a popup window with your container code snippet. This is the code that we will be using to add GTM to our sites. Copy this code to a text file or you can come get it again when you need.

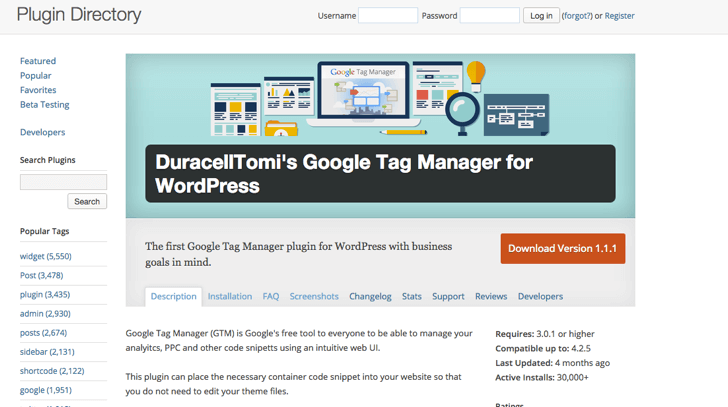
Ok, now we are ready to add this code to your website. This is going to be the most painful part for the majority of people learning GTM. The container script has to be placed IMMEDIATELY after the opening <body> tag on EVERY page you want to track. Assuming you are using a CMS such as wordpress, this would involve editing some files or writing some code to make sure it is on every page. Either way is fine, but if you are nervous about installing the code, I would suggest using this plugin. https://wordpress.org/plugins/duracelltomi-google-tag-manager/
Install GTM Via Code in Header
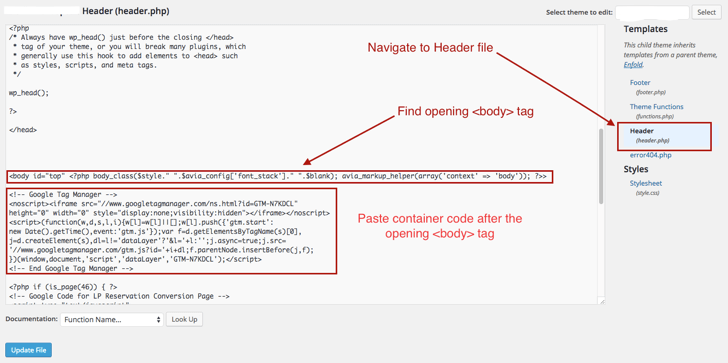
The first way we can install our code is just a simple copy and paste method. Now, if you do not know what you are doing I would get a developers help. If you do not install this correctly it could basically break your site, no bueno. If you do not have your container code, get it from the steps above and navigate to your header file.
The reason I prefer to add this code in the header file, is I know it is being deployed on all pages. And in order to track analytics through GTM, you need to have the container on EVERY page you want to track. ( I am using a wordpress site as an example, but the code needs to be placed after the OPENING body tag on every page.)
I am using the header.php file in my wordpress install to add it. Make sure it is after the <body> tag as this does not reside in the same place as Google Analytics. (head tags)
IF YOU DO NOT SEE YOUR CONTAINER IN THE SOURCE CODE, PLEASE BE SURE TO CLEAR BROWSER CACHE AND ENSURE CACHE PLUGINS ARE NOT CAUSING AN ISSUE WITH NOT SEEING YOUR CONTAINER CODE
Using A Wordpress Plugin For GTM Implementation
There are a few decent wordpress plugins that allow you to use GTM without basically touching any code. The wordpress plugin we will be using is https://wordpress.org/plugins/duracelltomi-google-tag-manager/. This is a well supported plugin and seems to be updated with new features regularly. If you are not comfortable adjusting code, I strongly suggest this plugin.
After you download the plugin and activate it, it is time to fill out the settings and give the plugin our GTM container id. Navigate to the plugin settings.
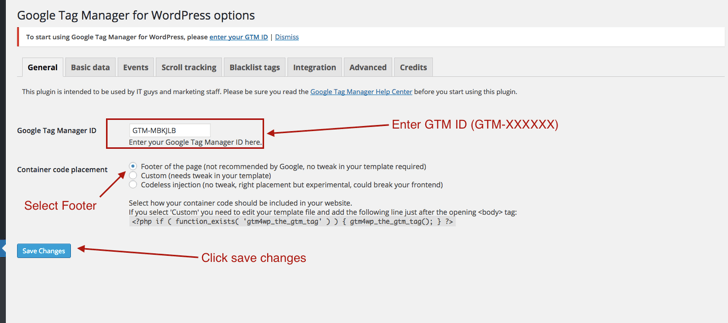
On the screen you are presented with a few options. First we want to make sure you add your GTM id (GTM-XXXXXX) into the field. Next, make sure “Codeless Injection” is the selected option for container code placement. Click save changes, and we are installed. There are a ton of other options, but for now we do not need to worry about them. MAKE SURE TO LOOK AT YOUR SITE AND NOTHING IS BROKEN!
Checking to see if the container is showing in the live source code
Now that we have added the container snippet to our site, it is time to see if we can see the code on the live site. I do this by checking the source code. Navigate to your website and right click in the content, and select “View Source”. From there we do a CTRL+F and search for “GTM”. If all is set up right, you should be able to see the GTM container in the source code.
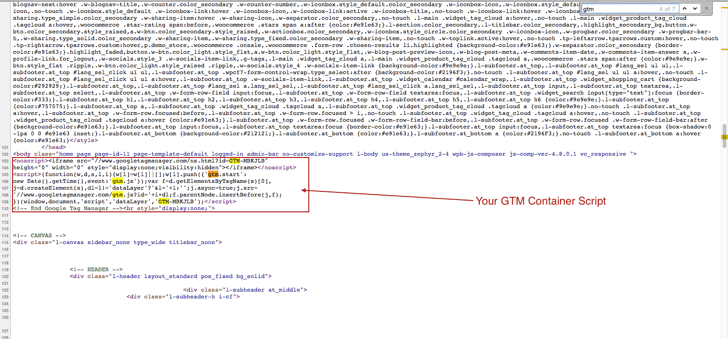
If your container is showing up we are good to start creating tags. if you do not see your container code when you look in the source code, go back through the steps above or take a peek at the GTM developers help center. https://support.google.com/tagmanager/answer/6102821?hl=en
Creating A Google Analytics Tracking Tag
Now that we have the container installed on our website, it is time to create some tags for tracking our visitors. The first tag we will be creating is a Google Universal Analytics tag. This tag allows us to use GTM to deploy our GA tracking scripts. This tag needs to be the first one built. If you do not have an analytics account, you can create one at http://www.google.com/analytics/.
Create Your Tag In GTM
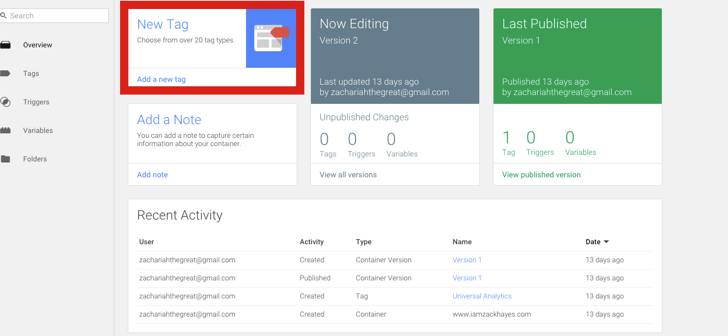
Navigate back to your GTM account page, and click on the “Add A New Tag” button from the account homepage.
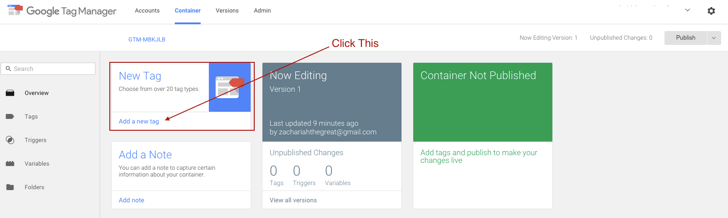
After clicking, you will be brought to the screen where we build the tag.
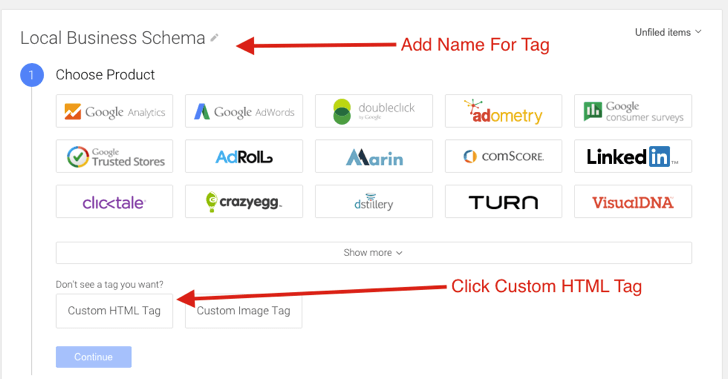
Name Your Tag And Choose Tag Type
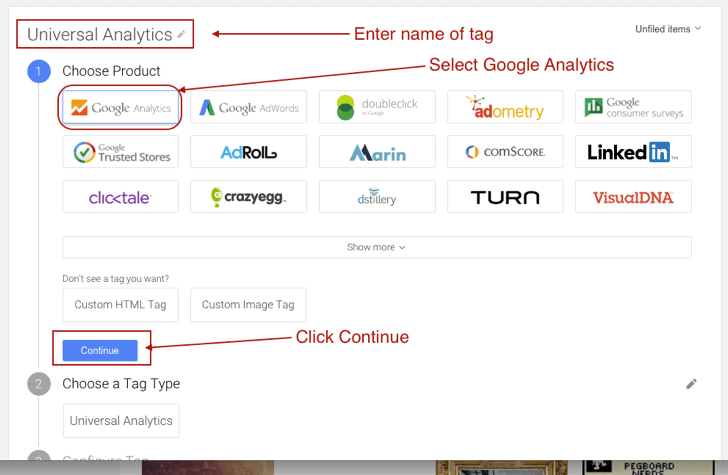
Choose a name for your tag. Since we are creating an analytics tracking tag, I name mine “Universal Analytics”. You can choose to name your whatever you would like, but I suggest making it descriptive enough that you know what it is from a glance.
After your tag is named, we then need to choose what product type this tag is. As you will see, there are many different types of tags, but for analytics tracking, we want to select “Google Analytics”. Then navigate down and click continue as shown below.
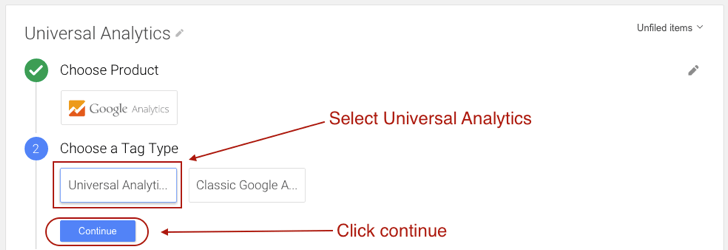
This brings us to the “Choose a Tag Type Options” since we will be using Universal analytics, we want to select that option and press continue. If you are using Classic Analytics please refer to the help center as I do not use Classic Analytics.
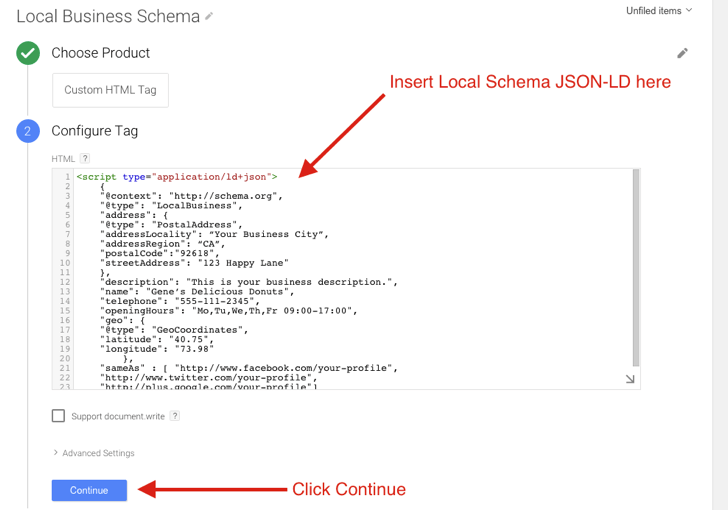
Configure Universal Analytics Tag
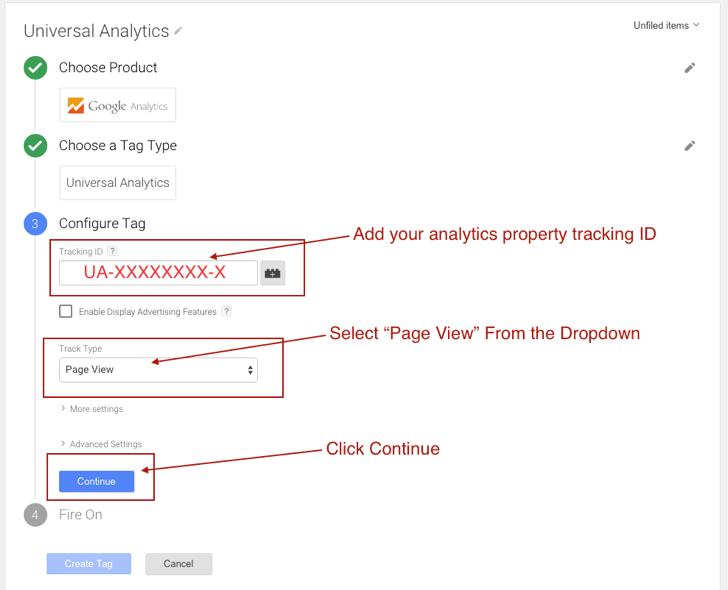
Now that you have chose your tag type, it is time to configure the tag information. The first thing we need to do is add our tracking ID. The ? next to the tracking ID field has a link to help you. I typically log into my analytics and get it there. If you can not find it please check out this link https://support.google.com/tagmanager/answer/6107124?hl=en&rd=1. After we have our ID we need to enter it into the field.
The “Enable Display Advertising Features” is an option that I do not use often, but if I am doing re-marketing I will have this turned on. So for this example I am going to leave it unchecked. But I encourage to learn more about what it does.
Then we have the “Track Type” dropdown option. This should show “Page View” by default, but if not, set it as Page View. There are More/Advanced settings below, but for this tag we do not need to worry about them. After your tag looks like the one pictured below (with your tracking id), click continue.
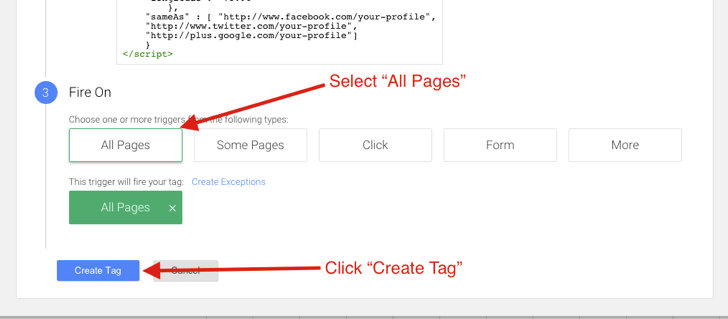
Choose What Pages The Tag Fires On
Now that we have our tag configured, we have to choose what pages of our site the tag will fire on. Considering this is the Universal Analytics tracking script, we most likely will want to track every page on our site. To do this we select the “All Pages” option as pictured below. This will then attach a trigger that will fire your tag on all pages of your website. After you can see the “All Pages” firing trigger attached, click “Create Tag”
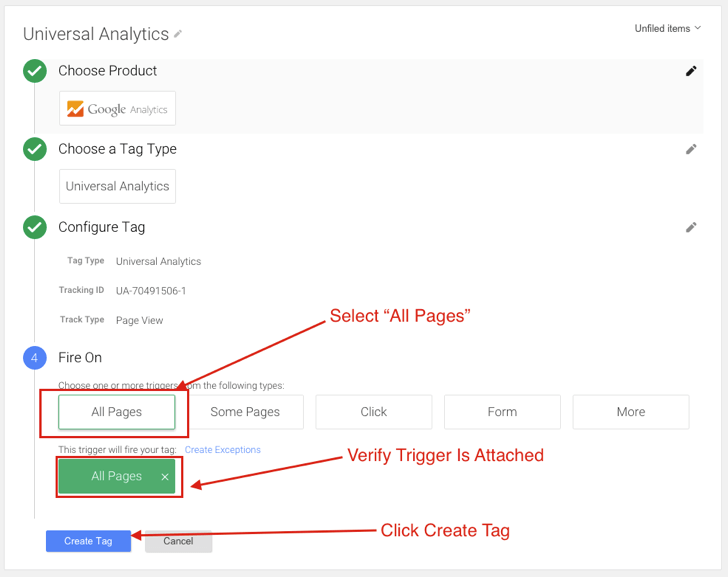
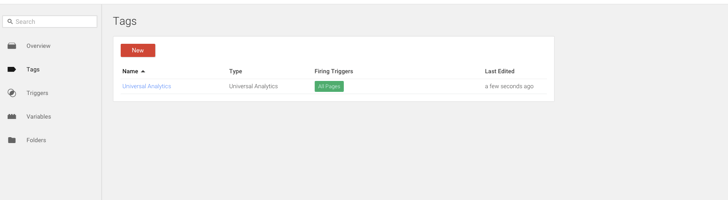
After you click create tag, you will be directed to the “Tags” screen. From this screen you can see all the created tags that are being stored in your container, as well as see triggers and editing information. If you created the tag correctly, the screen should look like below.
Testing GTM Tags
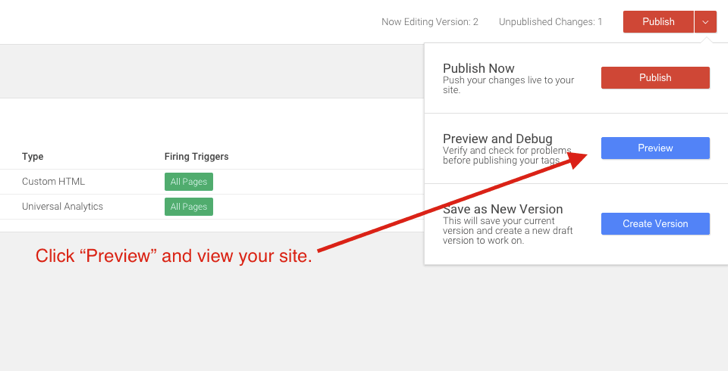
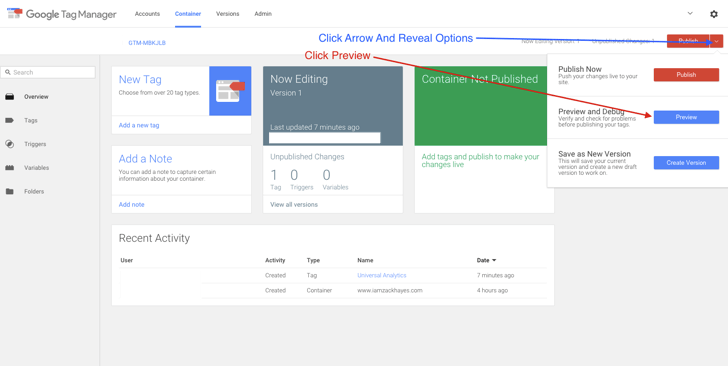
Now that we have created our Google Analytics tag in Google Tag Manager, it is time to test and see if our tag is working and tracking visitors properly. We do this by using a built in feature called “Preview Mode”. This give us an overlay when we visit our website and allows to see if our tags are firing in real-time. This is one of the best features in the tool as you can test unpublished versions of your container and make sure they are all working before publishing your container. The first step of this process is to click the preview option from the dropdown in the top right corner as shown below.
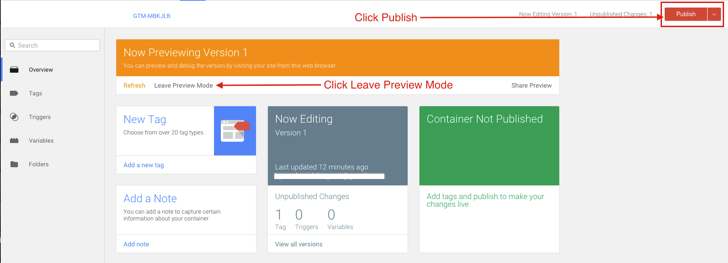
After you activate preview mode you will see a bright orange banner that says “Now Previewing Version X” on your homepage. This will stay this way until your leave the preview mode. Keep in mind after debugging and testing you will most likely want to turn it off.
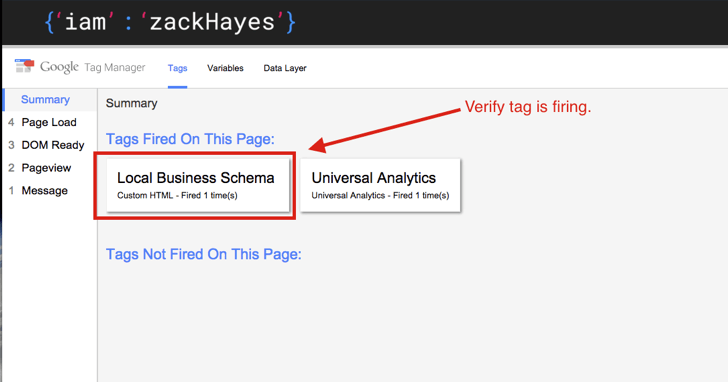
Now that we have our preview mode enabled, browse to your website. If everything to this point has been done correctly, you should see a “Google Tag Manager Overlay” This overlay shows you the tags that fired and did not fire on the page. This is extremely handy when you start tracking events and building more advanced tags. If it is working, you should see something like this:
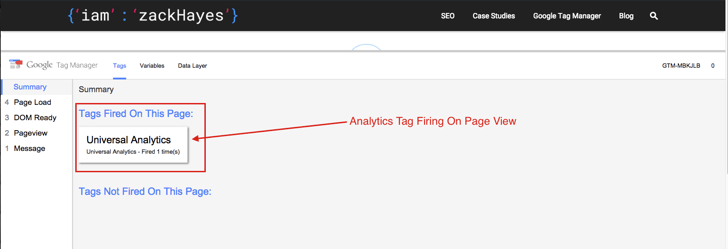
If you see that the tag did not fire, you will need to check that the tag firing rules is set to all pages. If you can see a screen like this, you have successfully added your analytics tracking to Google Tag Manager!
Publish Your GTM Container
Now that we have verified the tracking tag is being deployed and working, it is time to publish our container. Navigate back to the Google Tag Manager account screen for your container. Turn off the preview mode if you have not already. Navigate to the top right corner of the GTM interface and click publish.
Then you will see:
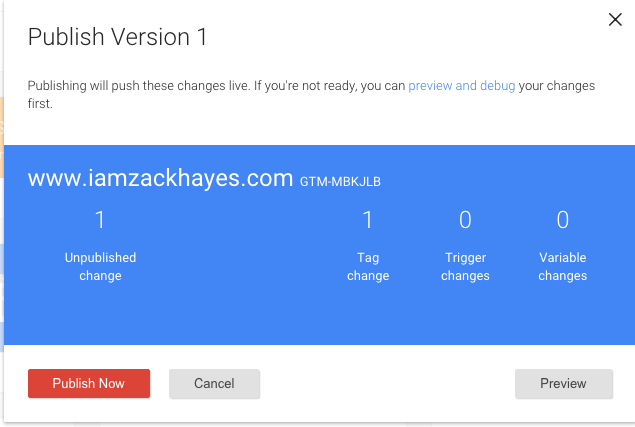
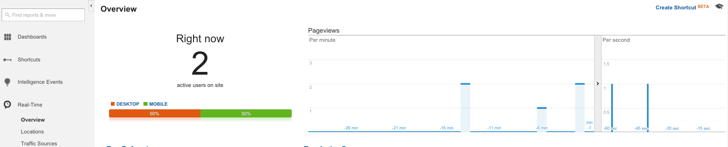
The last thing you are going to want to do is check and make sure that your tracking in Google Analytics. We can do this by looking at the “Real Time” section in your Google Analytics reporting account. Make sure you are not filtering out your IP and you should see something like this.
Welcome To Google Tag Manager
You now are able to create, install and create an analytics tracking tag using Google Tag Manager. The possibilities of this tool are endless, from event tracking to implementing Schema and structured data. I encourage you all to learn as much as you can about this tool as it may have a learning curve, but with time and practice it can speed your workflow up as well as give you insights you can not get elsewhere. I hope you enjoyed this guide and it helps you get your feed wet with GTM. If you have any questions you can drop them in here, or reach out to me as well. Good luck to you all and I hope this may lead to bigger and better things for you all!
You can follow me on twitter at https://twitter.com/iamzackhayes